Battery switch on travel trailer function is crucial for managing your RV’s power. Understanding how to properly use and maintain your battery switch is key to preventing electrical issues and ensuring a smooth camping experience. This guide covers various battery switch types, safe connection/disconnection procedures, troubleshooting common problems, and essential maintenance tips to keep your travel trailer running smoothly.
We’ll explore different battery switch configurations, from simple single switches to more complex dual or rotary switches, explaining their wiring and how they interact with your trailer’s charging system (solar panels, alternator). We’ll also delve into safety precautions, highlighting the importance of proper handling to prevent accidents and damage. Get ready to become a battery switch expert!
Understanding Battery Switch Functionality in Travel Trailers
A battery switch is a crucial component in a travel trailer’s electrical system, allowing you to manage the power flow from your trailer batteries and potentially from shore power. It’s essentially a safety and control device, preventing accidental drain of your house batteries and enabling you to choose which power source feeds your trailer’s appliances.
Battery Switch Types
Travel trailers typically utilize different types of battery switches to control power. The most common are single, dual, and rotary switches. A single switch simply connects or disconnects your house batteries from the trailer’s electrical system. A dual switch allows you to choose between your house batteries and shore power, while a rotary switch often provides more options, including the ability to isolate both battery banks and the trailer’s electrical system completely.
The choice depends on your setup and power needs.
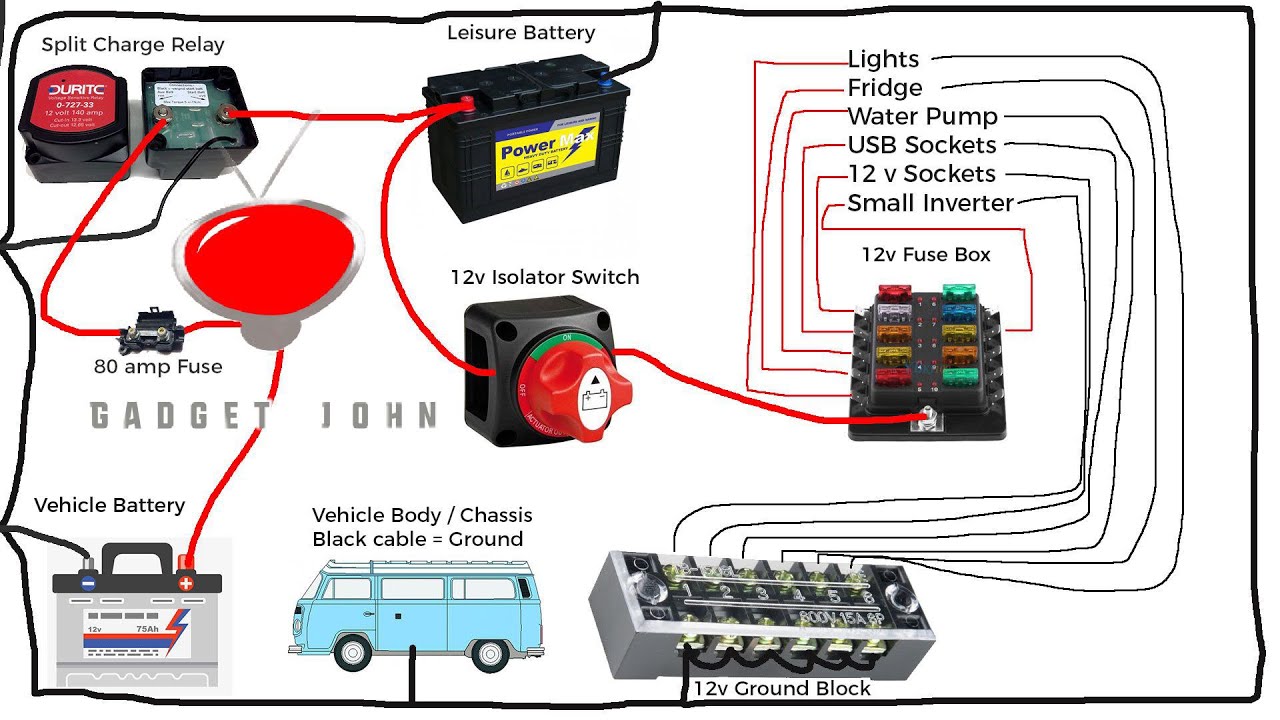
Typical Wiring Configuration
A basic battery switch system usually involves the battery terminals, the battery switch itself, and the main power distribution panel of the trailer. The positive (+) cable from your battery connects to the battery switch’s input terminal. From the switch, the power flows to the distribution panel, which then distributes power to the various appliances and systems in your trailer.
A negative (-) cable connects directly from the battery to the chassis ground, completing the circuit. More complex setups might include multiple batteries, isolators, and charge controllers.
Diagram of a Typical Battery Switch Setup
| Component | Description | Connection | Notes |
|---|---|---|---|
| House Battery (12V) | Provides power to the trailer’s appliances. | Positive (+) terminal to Battery Switch IN; Negative (-) terminal to chassis ground. | Typically a deep-cycle battery. |
| Battery Switch | Controls the flow of power from the battery to the trailer’s electrical system. | Positive (+) input from battery; Positive (+) output to distribution panel; Various positions (OFF, Battery, Shore Power, etc.) | Type varies (single, dual, rotary). |
| Distribution Panel | Distributes power from the battery switch to the various circuits in the trailer. | Positive (+) input from Battery Switch; individual circuit breakers to appliances. | Houses circuit breakers and fuses for protection. |
| Chassis Ground | Provides a common ground for the electrical system. | Negative (-) terminal of battery connected directly to the chassis. | Ensures a complete electrical circuit. |
Troubleshooting Common Battery Switch Issues

Dealing with a malfunctioning battery switch in your travel trailer can be frustrating, leaving you without power when you need it most. Fortunately, most problems are relatively straightforward to diagnose and fix with some basic troubleshooting skills. This section will guide you through identifying and resolving common battery switch issues.Troubleshooting a non-functioning battery switch involves systematically checking various components to pinpoint the problem.
This process eliminates guesswork and ensures you address the root cause efficiently. Remember safety first – always disconnect the battery before working with any electrical components.
Identifying Common Problems
Common problems include no power to the trailer, blown fuses, a switch that won’t toggle, or inconsistent power. These issues can stem from a variety of causes, ranging from simple blown fuses to more complex wiring problems or a faulty switch itself. Correct diagnosis is key to effective repair.
So, you’re an audiophile who loves to travel? Awesome! Check out this guide on creating the perfect audiophile travel setup for pristine sound on the go. Before you jet off, though, remember to sort out your travel insurance. Getting Aon travel insurance is a smart move; it’ll give you peace of mind knowing your gear and trip are covered.
That way, you can relax and enjoy your amazing music wherever your adventures take you!
Troubleshooting Steps
Before you begin, ensure you have the necessary tools: a multimeter, a fuse tester (optional but helpful), and appropriate screwdrivers.
- Check the Fuses: Begin by inspecting the fuses both in the battery switch itself (if it has them) and in the trailer’s fuse box. A blown fuse will appear broken or discolored. Replace any blown fuses with fuses of the same amperage rating. If a fuse blows immediately after replacement, this indicates a short circuit somewhere in the system that needs further investigation.
- Inspect the Wiring: Carefully examine all wiring connected to the battery switch for any signs of damage, such as fraying, corrosion, or loose connections. Look for areas where wires might be pinched or rubbing against metal parts. Tighten any loose connections and repair or replace any damaged wiring. Pay particular attention to the positive (+) and negative (-) connections.
- Test the Battery Switch: With the multimeter set to the appropriate voltage setting (usually DC volts), test the voltage at the input terminals of the battery switch (where the battery cables connect). If you have voltage here, but not at the output terminals, the switch itself is likely faulty and needs replacement. If there’s no voltage at the input, the problem lies with the battery or the cables connecting it to the switch.
- Test the Battery: Use the multimeter to check the voltage of your batteries. A fully charged 12V battery should read around 12.6V. A low voltage reading indicates a battery problem requiring charging or replacement.
- Check the Ground Connection: A poor ground connection can cause intermittent or complete power loss. Ensure the negative (-) battery cable is securely connected to a clean, grounded point on the trailer chassis. Corrosion on the ground connection can significantly impede current flow.
Testing the Battery Switch and Wiring
Using a multimeter, you can test continuity through the switch and check for voltage at different points in the circuit. A lack of continuity indicates a break in the circuit, while low voltage indicates a problem with the battery or wiring. Remember to always follow safety precautions when working with electrical systems. For example, if you’re testing for continuity, disconnect the battery before you start testing to prevent short circuits.
Maintenance and Upkeep of Battery Switches: Battery Switch On Travel Trailer Function
Keeping your travel trailer’s battery switch in good working order is crucial for reliable power. Regular maintenance prevents problems and extends the lifespan of this important component, ensuring you’re always ready for your next adventure. Neglecting maintenance can lead to corrosion, poor connections, and ultimately, battery switch failure.
So, you’re an audiophile who loves to travel? Awesome! Make sure you check out this guide on audiophile travel setups before you go – it’s packed with tips for keeping your tunes top-notch on the road. And while you’re planning, don’t forget travel insurance! Getting Aon travel insurance is a smart move; you’ll have peace of mind knowing you’re covered in case of unexpected events.
Happy travels!
Regular Maintenance Recommendations
Regular inspection and cleaning are key to preventing issues. A visual inspection should be part of your pre-trip checklist, allowing you to catch problems early. Additionally, performing a more thorough cleaning and inspection at least twice a year, or more frequently in harsh environments, is highly recommended. This helps maintain optimal performance and prevent premature wear.
Extending Battery Switch Lifespan
Several practices can significantly extend the lifespan of your battery switch. Using dielectric grease on the terminals helps prevent corrosion and ensures a clean, consistent connection. Avoid excessive force when operating the switch; rough handling can damage internal components. Storing your travel trailer in a dry environment also minimizes exposure to moisture, a major contributor to corrosion and switch failure.
Cleaning and Inspecting Battery Switch Terminals, Battery switch on travel trailer function
Before cleaning, always disconnect the battery’s negative terminal to prevent accidental short circuits. Use a wire brush or sandpaper to remove any corrosion from the terminals and the switch itself. Pay close attention to the contact points. Once clean, apply a thin layer of dielectric grease to all contact points. Visually inspect the switch for any signs of damage, such as cracks or loose connections.
If you find any issues, address them immediately.
Replacing a Faulty Battery Switch
Replacing a battery switch is a relatively straightforward process, but it’s essential to follow safety precautions. Begin by disconnecting the battery’s negative terminal. Then, carefully remove any wiring connected to the switch, taking note of which wire goes where. Unscrew the switch from its mounting location. Install the new switch, ensuring it’s securely fastened.
Reconnect the wiring, matching it to the previous configuration. Finally, reconnect the battery’s negative terminal and test the switch’s functionality. If you’re uncomfortable performing this task, it’s always best to consult a qualified technician.
Safety Precautions When Using Battery Switches
Working with your travel trailer’s battery system requires caution. Improper handling can lead to serious injury or damage to your equipment. Understanding and following safety procedures is crucial for a safe and enjoyable camping experience. This section Artikels essential safety practices to protect yourself and your RV.
Battery switches, while seemingly simple, can pose significant hazards if not handled correctly. The high voltage and amperage involved can cause severe electrical shocks, burns, or even explosions if precautions are not taken. Always approach battery maintenance and switch operation with respect and attention to detail.
Personal Protective Equipment
Working with batteries and electrical systems demands appropriate personal protective equipment (PPE). This minimizes the risk of injury from sparks, acid splashes, or electrical shocks. The right gear protects you from potential hazards and allows you to focus on the task at hand.
Hazards Associated with Improper Battery Switch Usage
Improper use of the battery switch can lead to several dangerous situations. Connecting or disconnecting batteries incorrectly can create sparks, potentially igniting flammable materials near the battery compartment. Furthermore, accidental short circuits can generate intense heat, leading to fires or even battery explosions. Ignoring safety protocols can result in serious injury or significant damage to your RV’s electrical system.
Preventing Electrical Shocks and Accidents
Preventing electrical shocks and accidents requires a multi-pronged approach. Before working on any electrical component, ensure the power is disconnected at the battery switch. Always double-check your work to ensure connections are secure and there are no exposed wires. Keep the work area clean and dry to reduce the risk of electrical shorts. Regular inspection of battery terminals and connections can identify potential problems before they escalate into hazards.
- Always wear safety glasses to protect your eyes from sparks and acid splashes.
- Use insulated gloves to protect your hands from electrical shocks and burns.
- Ensure the area is well-ventilated to prevent the buildup of flammable hydrogen gas.
- Never work on batteries or electrical systems in wet or damp conditions.
- Disconnect the negative (-) battery terminal first when disconnecting the battery.
- Reconnect the positive (+) battery terminal last when reconnecting the battery.
- Use a wrench with an insulated handle to avoid electrical shocks.
- Keep a fire extinguisher nearby in case of a fire.
- If you are unsure about any aspect of battery maintenance or switch operation, consult a qualified RV technician.
Mastering your travel trailer’s battery switch is a vital skill for any RVer. By understanding its function, performing regular maintenance, and knowing how to troubleshoot common issues, you can ensure reliable power and a worry-free camping experience. Remember safety first! Always disconnect power before working with batteries or the switch itself. With a little knowledge and attention, you can keep your RV’s electrical system running smoothly for years to come.
Clarifying Questions
What happens if I leave my battery switch on all the time?
Leaving your battery switch on constantly can drain your batteries, especially if you have parasitic draws from things like interior lights or electronics. It’s best to switch off when not using the trailer.
How often should I inspect my battery switch?
Inspect your battery switch at least once a year, checking for corrosion, loose connections, and damage. More frequent checks are recommended if you frequently use your trailer.
Can I use a different type of battery switch than the original?
While you can replace it, ensure the replacement switch has the correct amperage rating and wiring configuration to match your trailer’s electrical system. Consult a qualified electrician if unsure.
My battery switch is making a clicking noise. What’s wrong?
A clicking noise often indicates a problem with the switch itself or a low battery voltage. Check your battery voltage and inspect the switch for damage. If the problem persists, replacement might be needed.
